
Step-by-Step Guide: Build an SEO-Friendly Website Using Sanity Plugin SEO
In today’s digital era, simply having a website isn’t enough Search Engine Optimization (SEO) is key to making sure your site gets noticed.
For developers using Sanity CMS, optimizing for SEO can be a challenge. That’s where Sanity Plugin SEO comes in, helping you manage all your SEO data directly within your CMS.
In this comprehensive guide, we’ll show you how to:
- Set up a Sanity CMS project
- Install and configure the Sanity Plugin SEO
- Add SEO fields to your content types
- Integrate it with Next.js to display SEO metadata
- Deploy your site and optimize it for search engines
Whether you’re a beginner or experienced developer, this blog will help you create a website that ranks higher on search engines.
Set up a Sanity CMS project with Next.js
First of all you need to create two separate folders:
- Studio
- Frontend
Both folders will stay in the same root folder, it makes it easier to manage your code.
You can also include common configuration files like .gitignore and .editorconfig in the root, along with a README.md.
If you want to track your project with Git, run git init in the root folder.
Install Sanity and Blog Schemas
To set up Sanity Studio, you can use npm / yarn / pnpm, here we have used npm,
1
2
3
npm create sanity@latest
yarn create sanity@latest
pnpm create sanity@latest
You’ll need to create an account or log in, then follow these prompts:
1
2
3
4
5
6
7
$ Select project to use: Create new project
$ Your project name: sanity-tutorial-blog
$ Use the default dataset configuration? Yes
$ Project output path: ~/path/studio
$ Select project template: Blog (schema)
$ Do you want to use TypeScript? Yes
$ Package manager to use for installing dependencies? npm
Once installed, redirect to the studio folder and run:
1
npm run devThis starts the Studio on a local-host server http://localhost:3333/ , that will allow you to edit and publish your content on the go.
With your Sanity Studio up and running, it’s time to define your content schema. This is where you specify the types of content you’ll be publishing on your blog.
Open the schemas folder in your studio directory and create a new file for your blog post schema, such as blogPost.js.
Here’s a basic example of how to define a blog post schema:
1
2
3
4
5
6
7
8
9
10
11
12
13
14
15
16
17
18
19
20
21
22
23
24
25
26
27
28
29
30
31
32
33
34
35
36
37
38
39
40
41
42
43
44
45
46
47
48
49
50
51
52
53
54
55
56
57
58
59
60
61
62
63
64
65
import { defineField, defineType } from 'sanity'

export default defineType({
  name: 'post',
  title: 'Post',
  type: 'document',
  fields: [
    defineField({
      name: 'title',
      title: 'Title',
      type: 'string',
    }),
    defineField({
      name: 'slug',
      title: 'Slug',
      type: 'slug',
      options: {
        source: 'title',
        maxLength: 96,
      },
    }),
    defineField({
      name: 'author',
      title: 'Author',
      type: 'reference',
      to: { type: 'author' },
    }),
    defineField({
      name: 'mainImage',
      title: 'Main image',
      type: 'image',
      options: {
        hotspot: true,
      },
    }),
    defineField({
      name: 'categories',
      title: 'Categories',
      type: 'array',
      of: [{ type: 'reference', to: { type: 'category' } }],
    }),
    defineField({
      name: 'publishedAt',
      title: 'Published at',
      type: 'datetime',
    }),
    defineField({
      name: 'body',
      title: 'Body',
      type: 'array',
      of: [{ type: 'block' }],
    }),
  ],
  preview: {
    select: {
      title: 'title',
      author: 'author.name',
      media: 'mainImage',
    },
    prepare(selection) {
      const { author } = selection
      return { ...selection, subtitle: author && `by ${author}` }
    },
  },
})
This schema includes fields for the title, slug, publication date, and content of your blog posts. You can customize it further by adding fields for images, categories, or authors as needed.
After saving your schema, return to the Sanity Studio. You should now see the option to create new blog posts, allowing you to fill in your content with ease.
What is Sanity Plugin SEO ?
Now that your CMS is set up, it’s time to install the Sanity Plugin SEO.
This plugin simplifies the process of adding metadata, which is crucial for SEO. It handles meta titles, descriptions, and social media data (Open Graph and Twitter cards).
Key Features of Sanity Plugin SEO

- Customisable SEO Fields: Within your document schemas, you can quickly add and set up important SEO fields like title, description, keywords, and more.
- Sanity Studio Integration: Make sure SEO optimisation becomes a crucial step in your content development process by smoothly integrating SEO field creation into your Sanity Studio workflow.
- Compatibility: Easily connects with your current schemas and plugins and is fully compatible with Sanity v3. It also works well with React and Next.js, guaranteeing a seamless interaction with contemporary web development frameworks.
Installing the Sanity Plugin SEO
1. In your terminal, navigate to your studio directory and run:
1
npm install sanity-plugin-seo2. After installation, integrate it into your project by modifying your sanity.config.ts file:
1
2
3
4
5
6
7
8
9
10
11
12
13
14
15
16
17
18
19
import { defineConfig } from 'sanity'
import { structureTool } from 'sanity/structure'
import { visionTool } from '@sanity/vision'
import { schemaTypes } from './schemaTypes'
import { seoMetaFields } from "sanity-plugin-seo";

export default defineConfig({
  name: 'default',
  title: 'sanity-seo-project',

  projectId: 'Your Project Id',
  dataset: 'production',

  plugins: [structureTool(), visionTool(), seoMetaFields()],

  schema: {
    types: schemaTypes,
  },
})
3: Adding SEO Fields to Your Content Types
Let’s make your blog posts SEO-friendly by adding fields for meta titles and meta descriptions. These fields will ensure that search engines like Google know what your content is about, which helps in ranking your pages.
Modifying the Schema,
1. Open the post.js file in your schema directory.
2. Add the following fields to your post schema:
1
2
3
4
5
6
7
8
9
10
11
12
13
14
15
16
17
18
19
20
21
22
23
24
25
26
27
28
29
30
31
32
33
34
35
36
37
38
39
40
41
42
43
44
45
46
47
48
49
50
51
52
53
54
55
56
57
58
59
60
61
62
63
64
65
66
67
68
69
70
71
72
73
74
75
76
77
78
79
80
81
82
83
84
85
86
87
import { defineField, defineType } from 'sanity'

export default defineType({
  name: 'post',
  title: 'Post',
  type: 'document',
  groups: [{
    title: 'SEO',
    name: 'seo'
  },
  {
    title: 'Main',
    name: 'main',
    default: true
  }],
  fields: [
    defineField({
      title: "Seo",
      name: "seo",
      type: "seoMetaFields",
      group: "seo"
    }),
    defineField({
      name: 'title',
      title: 'Title',
      type: 'string',
      group: "main"
    }),
    defineField({
      name: 'slug',
      title: 'Slug',
      type: 'slug',
      options: {
        source: 'title',
        maxLength: 96,
      },
      group: "main"
    }),
    defineField({
      name: 'author',
      title: 'Author',
      type: 'reference',
      to: { type: 'author' },
      group: "main"
    }),
    defineField({
      name: 'mainImage',
      title: 'Main image',
      type: 'image',
      options: {
        hotspot: true,
      },
      group: "main"
    }),
    defineField({
      name: 'categories',
      title: 'Categories',
      type: 'array',
      of: [{ type: 'reference', to: { type: 'category' } }],
      group: "main"
    }),
    defineField({
      name: 'publishedAt',
      title: 'Published at',
      type: 'datetime',
      group: "main"
    }),
    defineField({
      name: 'body',
      title: 'Body',
      type: 'array',
      of: [{ type: 'block' }],
    }),
  ],

  preview: {
    select: {
      title: 'title',
      author: 'author.name',
      media: 'mainImage',
    },
    prepare(selection) {
      const { author } = selection
      return { ...selection, subtitle: author && `by ${author}` }
    },
  },
})
Install Next.js
Now, You need to set up your Next.js app in the main root project folder:
1
npx create-next-app@latestAfter that on the prompt, name your project frontend and choose the following options:
1
2
3
~/path/project-name
- studio
- frontend
In the frontend folder, your package.json should look something like this:
1
2
3
4
5
6
7
8
9
10
11
12
13
14
15
16
17
18
19
20
21
22
{
  "name": "frontend",
  "version": "0.1.0",
  "scripts": {
    "dev": "next dev",
    "build": "next build",
    "start": "next start",
    "lint": "next lint"
  },
  "dependencies": {
    "@next/font": "13.1.6",
    "@types/node": "18.11.18",
    "@types/react": "18.0.27",
    "@types/react-dom": "18.0.10",
    "eslint": "8.33.0",
    "eslint-config-next": "13.1.6",
    "next": "13.1.6",
    "react": "18.2.0",
    "react-dom": "18.2.0",
    "typescript": "4.9.5"
  }
}
Next.js handles routing automatically based on your folder structure.
Create a pages folder and add an index.tsx file to make it the front page of your site. Replace the content in index.tsx with:
1
2
3
4
5
6
7
8
9
const Index = () => {
    return (
      <div>
        <p>Hello Guys!</p>
      </div>
    );
};

export default Index;
You can also remove the existing CSS files and references from _app.tsx if you don’t need them.
Finally, run your Next.js app:
1
npm run devHead over to http://localhost:3000/ in your browser, and you should see your "Hello Guys!" message.
Connect Next.js with Sanity
Let's use React to render some content that we pulled from Sanity's Content Lake.
Now, What is content lake ?

Content lake (Image courtesy of Sanity CMS) is where your content will be stored and accessed. Its fully managed by sanity and runs on the cloud. You can access the content lake via sanity API [Application Programming Interface] either directly through the HTTP API or by utilising one of our client libraries.
On your terminal type Ctrl + C(windows) or Command + C(Mac OS) to terminate the current development server.
To start, install the requirements required to connect to the Sanity API in the frontend folder:
1
npm install @sanity/clientThe root frontend folder should contain a new file named client.ts.
Enter the following after opening the file:
1
2
3
4
5
6
7
8
// client.ts
import sanityClient from '@sanity/client'

export default sanityClient({
  projectId: 'your-project-id',
  dataset: 'production',
  useCdn: true
})- projectId: You can find the project id in sanity.json file.
- dataset: Production or the name you chose in step 1 of installation.
- useCdn: Add `false` if you want to ensure fresh data.
When working with sensitive data in your application, it's essential to prioritize security.
One effective way to protect your Sanity configuration is by using a .env file.
This file should be created in the root of your frontend folder and can store private information that shouldn't be exposed to end users.
Here’s how to set it up:
1. Create a .env file: In the root directory of the folder named frontend , create a file named .env.
2. Add your configuration: Populate the .env file with your Sanity project details. For example,
1
2
3
SANITY_PROJECT_ID=12345678 [id of your sanity project]
SANITY_DATASET=production
SANITY_USE_CDN=false
Then install dotenv plugin,then add the below code,
1
2
3
4
5
6
7
8
9
10
11
12
import sanityClient from '@sanity/client';
import dotenv from 'dotenv';

dotenv.config();

const client = sanityClient({
   projectId: process.env.SANITY_PROJECT_ID || '',
   dataset: process.env.SANITY_DATASET || 'production',
   useCdn: process.env.SANITY_USE_CDN === 'true'
});

export default client;
You can import this client wherever you want to pull content out of your Sanity project.
Variables in sanity.config.ts in the studio folder should be the same as values for projectId and dataset.
Now, to create dynamic routing structure in your application, do this:
- Create A Folder: Go to your pages directory, create a new folder called post.
- Create a Slug file that's dynamic: In the post folder, you'll now create a file called [slug].tsx. In this file, you'll be using the slug that was passed in the URL for the dynamic routes.
- Setup Your Dynamic Route: In the [slug].tsx file, you'll now add the code that renders the slug as an <h1> element. Just like above,
1
2
3
4
5
6
7
8
9
10
11
12
13
14
// post.tsx
import { useRouter } from 'next/router'

const Post = () => {
  const router = useRouter()

  return (
    <article>
      <h1>{router.query.slug}</h1>
    </article>
  )
}

export default Post
Test Your Setup Run your application and go to http://localhost:3000/ post/test. You should see "test" rendered as an H1 heading.
Get the content from sanity with sanity-plugin-seo and next-seo
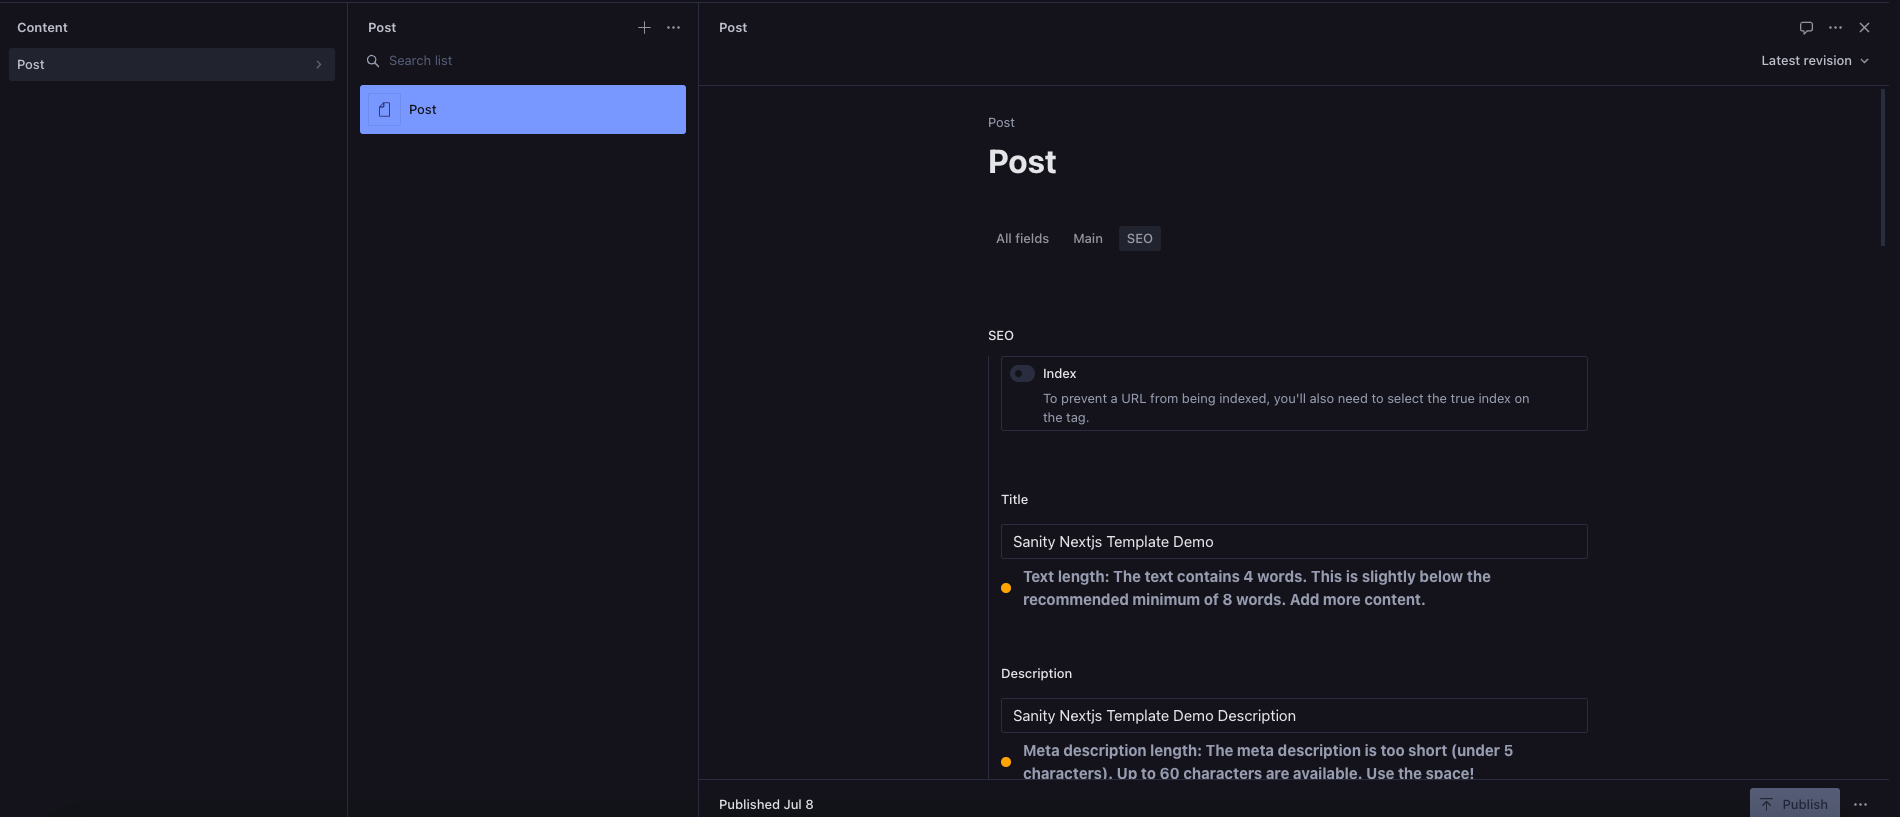
Open the Studio at http://localhost:3333/. Now, let's create a new post called Lorem Ipsum Dolar Sit Amet", as an example. Generate a slug. Fill in all your post's seo details in the seo tab. Don't forget to publish it for the content to show up via the public API.
That's how you implement it in your [slug].tsx file:
1
2
3
4
5
6
7
8
9
10
11
12
13
14
15
16
17
18
19
20
21
22
23
24
25
26
27
28
29
30
31
32
33
34
35
36
37
38
39
40
41
42
43
44
45
46
47
48
49
50
51
52
53
54
55
56
57
58
59
60
61
62
63
64
65
66
67
68
69
70
71
72
73
74
75
76
77
78
79
80
81
82
83
84
85
86
87
88
89
90
91
92
93
94
95
96
97
98
99
100
101
102
103
import { useRouter } from "next/router";
import client from "../../lib/sanity";
import { PortableText } from "@portabletext/react";
import { NextSeo } from "next-seo";

const query = `*[_type == "post" && slug.current == $slug][0]{
  title,
  body,
  slug,
  seo {
    _type,
    metaTitle,
    metaDescription,
    nofollowAttributes,
    openGraph{
      _type,
      title,
      url,
      description,
      siteName
    },
    seoKeywords,
    twitter{
      _type,
      cardType,
      handle,
      site,
      creator
    }
  }
}`;

export async function getServerSideProps(context) {
  const { slug } = context?.params;
  const post = await client.fetch(query, { slug });

  if (!post) {
    return {
      notFound: true,
    };
  }

  return {
    props: {
      post,
    },
  };
}

const Post = ({ post }) => {
  const router = useRouter();
  const {
    metaTitle,
    metaDescription,
    openGraph,
    twitter,
    nofollowAttributes,
    seoKeywords,
  } = post?.seo || {};

  const robotsContent = nofollowAttributes
    ? "noindex,nofollow"
    : "index,follow";

  return (
    <>
      <NextSeo
        title={metaTitle || "Default Title"}
        description={metaDescription || "Default Description"}
        robots={robotsContent}
        openGraph={{
          type: openGraph?._type || "website",
          title: openGraph?.title || metaTitle,
          description: openGraph?.description || metaDescription,
          url: openGraph?.url,
          site_name: openGraph?.siteName,
        }}
        twitter={{
          cardType: twitter?.cardType,
          site: twitter?.site,
          handle: twitter?.creator,
          title: openGraph?.title || metaTitle,
          description: openGraph?.description || metaDescription,
        }}
        keywords={seoKeywords}
      />

      <article className="p-8">
        {router?.query?.slug && <h1>{router?.query?.slug}</h1>}
        {post?.title && (
          <h2 className="text-2xl font-bold capitalize pb-2">{post?.title}</h2>
        )}
        {post?.body && (
          <div>
            <PortableText value={post?.body || []} />
          </div>
        )}
      </article>
    </>
  );
};

export default Post;
Key Components of the Code
Imports:
1
2
3
4
import { useRouter } from "next/router";
import client from "../../lib/sanity";
import { PortableText } from "@portabletext/react";
import { NextSeo } from "next-seo";- useRouter: This hook allows you to interact with a router object so that you can navigate through different pages.
- client: A custom client for working with Sanity, which is where the posts are hosted.
- portableText: The component helps you to render the rich text content being used within Sanity.
- nextSeo: This is the component that will help handle SEO settings easily.
GROQ Query:
1
const query = `*[_type == "post" && slug.current == $slug][0]{...}`;GROQ stands for Graph-Relational Object Queries. Generally, It is used to fetch information from Sanity, querying the blog post using a slug; that is, this is part of the URL which identifies what post has been reached.
Server-Side Rendering [SSR]:
1
2
3
4
5
6
7
8
9
10
export async function getServerSideProps(context) {
  const { slug } = context?.params;
  const post = await client.fetch(query, { slug });

  if (!post) {
    return { notFound: true };
  }

  return { props: { post } };
}
This function runs on the server on any request of the page on the browser. The slug from the url that is given to view this particular blog post is utilized in fetching the blog post.
It returns a notFound flag if it does not find a post, indicating that Next.js should show the 404 page.
If the post is found, it returns the post data as props to the component.
The Post Component:
1
2
3
4
5
const Post = ({ post }) => {
  const router = useRouter();
  const { metaTitle, metaDescription, openGraph, twitter, nofollowAttributes, seoKeywords } = post?.seo || {};
  //...
};
This is the main component to render the blog post. It uses the hook of useRouter to fetch the information of the current route. It destructs the SEO-related information from the object post.
SEO Management:
1
const robotsContent = nofollowAttributes ? "noindex,nofollow" : "index,follow";Above code describes that search engine should or not index the page and then proceed to crawl all links from the nofollowAttributes of the SEO settings for that post.
Rendering the SEO Tags:
1
2
3
4
5
6
<NextSeo
  title={metaTitle || "Default Title"}
  description={metaDescription || "Default Description"}
  robots={robotsContent}
  //...
/>
This code contains the setting for the SEO metadata of the page, including the title, description, and Open Graph tags - useful when sharing links on social media.
Rendering the Post Content:
1
2
3
4
5
<article className="p-8">
  {router?.query?.slug && <h1>{router?.query?.slug}</h1>}
  {post?.title && <h2 className="text-2xl font-bold capitalize pb-2">{post?.title}</h2>}
  {post?.body && <div><PortableText value={post?.body || []} /></div>}
</article>
This code includes the title and body of the post.
The PortableText component is used to render the rich text content from the body of the post.
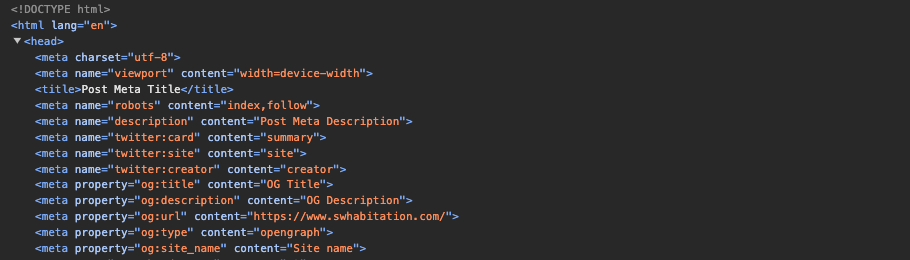
Now, above is the final output from the screenshot. In the head section, you can see the following key elements for SEO optimization:
- Title Tag: It clearly reflects the page content.
- Meta Description: It provides a concise summary, including relevant keywords.
- Robots Meta Tag: It indicates indexing preferences for search engines.
- Open Graph Tags: It enhances social media sharing visibility.
- Twitter Card Tags: Optimizes content presentation on Twitter.
Deployment of Your Next.js Application
You're good to go with your local setup and you are now ready to deploy your Next.js project to Vercel, Netlify, or any other platform that supports Next.js.
Your data will automatically be fetched as Sanity is a headless CMS. Now, follow the below steps to deploy:
Steps to Deploy:
1. Build Your Application:
Run the following command in your terminal to build your application for production.
1
npm run buildThis will bundle up your project and prepare it for deployment.
2. Test Your Application Locally (Optional)
If you want to test the production build locally you'll run:
1
npm run startThis will launch an application in production mode so you can be sure everything works.
3. Deploy to Vercel
- Get Your Project Ready: Check That Your Code Is Good, Ensure your Next.js application is running fine on your local machine, and all features should be tested.
- Check Environment Variables: If your app uses environment variables (such as your Sanity project ID), be sure to write those down and save them for later.
Create a Vercel Account
- Sign Up: Navigate over to the Vercel website and sign up for free if you don't already have an account.
- Connect GitHub: If you plan to directly deploy from a Git repository, connect your GitHub account at the point of signup.
- Import Your Project: Once logged in, select the "New Project" button on your Vercel dashboard.
- Choose Your Git Repository: Vercel will display all GitHub repositories you've connected. Choose the one containing your Next.js project.
Configure Project Settings:
- Framework Preset: Vercel should automatically identify that you're using Next.js. Ensure it highlights that.
- Environment Variables: Add environment variables here if your application requires them. For example, you might input your Sanity project ID and dataset name something like:
1
2
3
SANITY_PROJECT_ID: your_project_id
SANITY_DATASET: your_dataset_name
SANITY_USE_CDN: true (if you want to use the vercel CDN)
Deploy Your Application
- Build Command: The default build command for Vercel is npm run build, and the output directory is .next. You do not normally need to override either.
- Click Deploy: Once you've set your options, click the "Deploy" button. Vercel begins building your project.
Deploy to Other Platforms [optional]
If you are using a different platform, such as Netlify, you would refer to the documentation there about deploying a Next.js application; however, most platforms will require you to connect your Git repository and it will take care of the build.
Conclusion
In summary, This Sanity SEO plugin changes the game for the blogger and content creators who want to increase their online presence. The incredible power to optimize the content on search results is made available right within Sanity CMS by this plugin. The built-in features make metadata management, social media previews, and structured data relatively effortless, and this is what makes your posts not just reach a wider audience but engage those you want to reach.
Among such competition, the sanity SEO plugin must be part of what you integrate into your blogging for great optimization and impact of your content.
So, if you are actually interested in taking your blog or website to the top of its SEO list, hurry up and and checkout the sanity-seo-plugin which is definitely worth checking out!